Like many Vaios, mine overheated rapidly, often cutting out when it got too hot. These are the steps I took to clean the fans, steps discovered through much trial, error, and fear that I was going to break something important. Sony certainly tells you nothing. I hope they're useful.

First, remove the board above the keyboard. There are no screws, just push in the four spring clips hidden above the top row of keys. A slim screwdriver works fine. (Simple when you know, enrageing when you're trying to find out)

Second, remove the keyboard, dead easy, just one screw. Fold back.

Third, remove the protective plate. A lot of screws but no electronics. At the end, it just lifts off.
 Fourth, unscrew the four screws holding down the fan unit. These screws don't come out completely.
Now the tricky part : very gently ease the fan unit up and out. It's being held in place by the pins of the processor (had I known this before attempting it I would never have tried !) so don't do this in a rush, just carefully and gently lift.
 This is what it looks like when the fan unit has been turned back. The processor (orange arrow) is stuck to it. When I first did this, I assumed this was normal, cleaned the fans and remounted the lot. This does not work !! The processor is not properly in place and the computer is dead when you turn it back on (heart-stopping !).
So, this is the frightening bit. You must in fact remove the processor from the fan unit. It's only glued on and separates quite easily. The tip of a screwdriver inserted underneath and given a twist works very well !
 In this image, the processor has been removed from the fan unit and replaced in its white plastic housing. There's a screw on this plastic housing (orange arrow) which needs to be turned into the "unlock" position first (half a turn - there's an icon which shows you). Next put the processor into place. Then turn the screw back to the "lock" position. The whole unit moves back a couple of millimeters to the left. And that's the end of the frightening bit.
(Basically, when the machine was assembled, they dabbed glue on the top of the processor just before adding the fan unit. So the first time you open it, the Lock/Unlock screw is inaccessible and the processor comes away with the fan. The next time you clean the unit, the processor will be independent of the fan so you won't have to do this again)
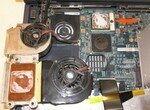
 So now at last you can start cleaning ! Remove the three screws on each fan, and lift out the fans without disconnecting any cables. The dust is hidden between the fan and the heat diffuser (position shown here in purple), and can be removed with tweezers. There will probably be a surprising amount.
 Dust removed from my fans ! There's clearly a problem with Vaio's design, they need some sort of filter over the fan openings underneath the machine to stop this happening again. I haven't tried it yet, but a square of porous paper taped over the opening should do the job.
Note : These tips are not official recommendations and the author cannot be held responsable in any way for any consequences which might arise from following them. Use them at your own risk.
For info on other Vaio models, try http://repair4laptop.org


